Once you have set up your categories and location, you can begin to build your asset listing and record all relevant information at Asset Management > Asset Maintenance.
Your full asset listing with its status is available here, you can click Export to download the report in Excel format if required. You may also view, edit and delete the asset.
Note:
View
Edit
Delete
Click Add Asset to create a new asset. Fill in the relevant information about the asset, the asset description, category, brand, model and serial number. The system will auto-assign a Tag ID if you do not enter one. Continue to update the product details such as the purchase date, cost, supplier and remarks for important information such as warranty information.
At Ownership, you can indicate whether an asset belongs to the company or is personal in case you would like to capture personal assets used as well.
At Document, you can upload relevant document such as the invoice or photo of your assets. Click Save after you complete.
ASSIGN AN ASSET
You can assign the asset after you create the asset.
At Asset List in Asset Maintenance, select the asset from the asset listing and click edit.
Click on More Action and select Assign to assign the asset to an employee.
* You can perform the same thing by clicking Assigned To as well.
Update the Assigned Date and Assigned to who from the pop-out box. You can input a due date for return or remarks if required. By default, a notification will be sent to the employee, you can disable the notification by disabling the Notify Employee. Click Assign upon completion.
The Assigned To and Status is now updated. At the same time, you will also see that the History tab has appeared and that a log of the assigned information has been created.
RETURN OF AN ASSIGNED ASSET
At Asset List in Asset Maintenance, select the asset from the asset listing and click edit.
Click on More Action and select Return to update the return of asset.
* You can perform the same thing by clicking Assigned To as well.
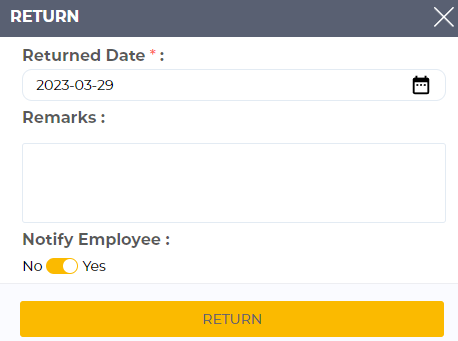
Update the Returned Date and put in remarks if necessary. By default, a notification will be sent to the employee, you can disable the notification by disabling the Notify Employee. Click Return upon completion.

The asset is available and the log of return is updated in the History tab as well.
During employee offboarding, HR admins can also conveniently update the asset return status by accessing all information relevant to a specific employee's assets at the Employee Maintenance. This ensures that all assets are properly accounted for and returned, preventing any potential loss or misuse of company property.
Learn more about PeopleX Asset Management.

Comments
0 comments
Please sign in to leave a comment.